📹 How Does SmarterQueue Publish Your Content?
SmarterQueue is like having an AI social media assistant. Instead of manually scheduling each post, you can simply create Categories and set Timeslots in your Posting Plan. SmarterQueue will then autonomously pull and publish the right content from your Queue at the times you set.
In This Article
- Video Walkthrough
- How Does SmarterQueue Know What To Post And When?
- How To Specifically Schedule Your Content
How Does SmarterQueue Know What To Post And When?
Rather than manually scheduling each and every post you create, you can simplify your workflow by creating a Posting Plan! It's a recurring weekly planner where you tell SmarterQueue what kind of content you want to be published and when.
Then, when you're creating posts, all you have to do is add them to your Queue, and they will be automatically published based on the Posting Plan that you create✨
1. To begin, navigate to Categories using the top menu in your SmarterQueue dashboard.

Categories are used to organize your content into different types, which will be vital to automate scheduling and analytics.
While SmarterQueue provides some Categories when you first begin, you can change them to fit your needs - adjust the name and color, enable or disble Social Profiles for the Category, as well as add new Categories and delete unnecessary ones!
2. Go ahead and customize your Categories. We'll create a brand new one, called "General", to show you how we'll automate scheduling.

💡Tip: Take advatange of Seasonal Categories to automate scheduling for promotions, events, holidays, etc. See What Are Seasonal Categories & How Can I Use Them? for more information.
3. After setting up your Categories, navigate to the Posting Plan using the top menu in your SmarterQueue dashboard:

4. From here, you can drag and drop Timeslots onto the weekly schedule.
💡 A Timeslot consists of a combination of a Category and preferred Social Profile(s).
By adding Timeslots to your Posting Plan, you tell SmarterQueue what kind of content you want to be published (based on Category), when you want it to be published (day of the week and preferred time), and where it should be published (on which social profiles).
SmarterQueue will then take that information to automate publishing so that you never have to worry about when your content is being published.

As you can see above, we started with one Category - the "General" Category - and we're adding Timeslots for it and our Instagram Profile for different days and times. We're choosing Mondays at 9:30, Wednesdays at 12:00, and Fridays at 10:15!
With the above Posting Plan, SmarterQueue will take posts from the Queue that are created for the "General" Category and our Instagram profile and publish them in the order you've added them, on the days and at the times of the Timeslots.
5. Once you are done setting up your Posting Plan, you can start adding content to your Queue! Click "Create a Post" to open the Post Editor. Select the Category that you'd like to create content for, and the Social Profile(s) you want the content to be published:

To take advantage of the automation we've just set up in our Posting Plan, we'll create posts for the "General" Category and our Instagram profile.
6. Add your text and media to the post.

Tip: You can can create text and media variations for your posts! If you set a post as Evergreen (and thus recycle to boost your engagement), having text and/or media variations is a great way to keep your content fresh for longer and see what your audience likes best.
Read more about variations in What Are Variations? How To Vary Images & Text For Evergreen Posts.
Tip: Having writers block? Use our AI Caption Writer to generate captivating text captions.
7. Under Post Timing, choose "Add to Queue" to send your posts to the Queue (top or bottom), and your post will be published based on the Posting Plan you created earlier.

Choose "Add to top of Queue" if you want the post to be published along with the earliest Timeslot.
Choose "Add to bottom of Queue" if you would like any content you've already created for the Category and social profile combination to publish before this new post.
Tip: Make sure to check the "Recycle After Posting" button to use Evergreen recycling to make sure that your posts reach more of your audience and keep your Queue full 💪
8. The Queue is where you will see posts that will be published to your followers, as well as the dates and times when they will go out!

Depending on whether you selected the top or bottom of the Queue, you'll find the newly created post at the top or bottom of the Queue for that specific Category and Social Profile combination.
9. You can repeat this process to create more Categories and organize your different types of content:

10. Add Timeslots for the rest of your Categories and Social Profiles to customize automation rules for publishing:

SmarterQueue will automatically publish the top post in the Queue for each Social Profile and Category combination with the next matching Timeslot. For example, the top "General" Category post for Instagram will be posted at 11:45 on Monday and then, at 12:45, the top "Inspiration" post for the Instagram profile will be published.
💡 Tip: You can create Timeslots with multiple profiles! SmarterQueue will send the top post in the Queue for each Category and Social Profile combination.

11. If you scroll down in the posting Plan, you can see how many Timeslots you've created for each Category and Social Profile combination:

This will clarify how many posts will be published for each Category and Social Profile combination every week.
12, As you add more and more content to your Queue, you can use Filters (found on the left-hand side of the Queue) to check specific Categories, social profiles, or exact combinations, and see when your posts will be published 💪

How To Specifically Schedule Your Content
Although automating the majority of your content can significantly enhance efficiency, there may arise situations where you need to publish time-sensitive/specific posts.
In such cases, when it's essential to exercise precision beyond simply adding to the Queue, SmarterQueue allows you to manually set multiple specific dates and times for your content to be published, or create recurring posts.
This way, you decide exactly when each post goes out and how many times, without using the Timeslots in your Posting Plan (which will continue to publish the content you've sent to your Queue, independently of your other manually scheduled posts).
When creating your content in the Post Editor, you can either:
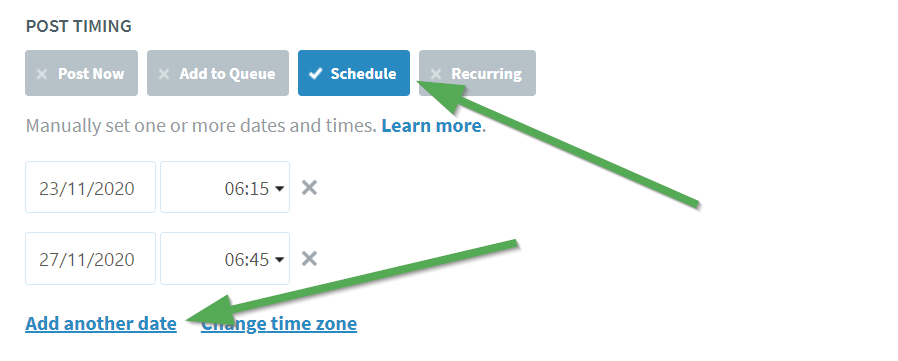
1. Manually set times and dates for your time-sensitive content, for each specific post.
2. Create recurring posts for content that needs to be published daily, weekly, yearly, or those special posts that only work on Mondays.
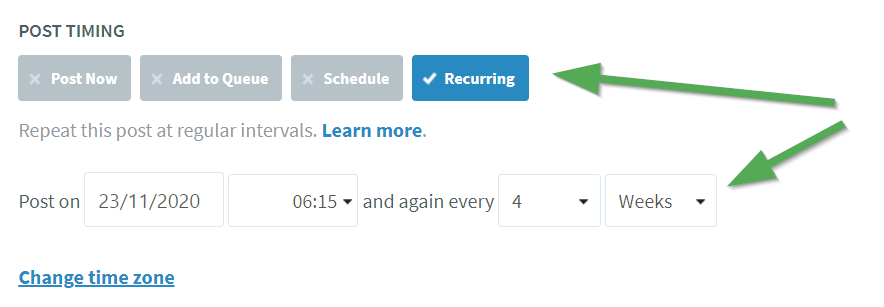
All these posts will also come up in your Queue, but they will be pinned to the selected dates and times:

Keep in mind that scheduled and recurring posts are prioritized over content being published based on the Timeslots in your Posting Plan.
This means that if you schedule a post for the same date and time as a Timeslot in your Posting Plan (added for posts created for the same social profile and Category combination as your scheduled post), the scheduled post will be published instead, and the Timeslot will be skipped.